Practical rendering advice
Surveying a wall with stone, brick and old render
A Bradford wall can contain sandstone, common brick, block infill and old render in one elevation, often hidden under the same paint. Each takes render differently, and the junctions between them are where cracks start. This guide explains how to tell the materials apart, how each is prepared and how the junctions are handled.

On this page
Why each background behaves differently
The background is the material that supports the render; the finish is the surface you see. A painted front can look uniform while covering sandstone around one opening, common brick beside another and an old render patch between them. Each draws water differently and offers a different grip. Dense block and concrete have low suction and little key. Lightweight block and some soft brick have high suction and can pull water out of fresh render too fast. Sandstone varies with the bed it came from.
Manufacturers deal with this by matching the base coat or primer to the background. K Rend’s range, for example, has HP12 for dense block, render boards and brick with its R7 primer, HPX with fibres for lightweight block or high-suction brick, and alkali-resistant mesh required at stress points such as reveals. Lime Green’s preparation guidance shows the same idea for lime: test suction by wetting the surface, dampen a wall that drinks water instantly, and use a stipple coat on dense backgrounds. A wall rendering proposal for a mixed elevation should say which treatment goes on which area.

Small details and added depth
A quotation based only on the broad rectangle of an elevation can miss the parts that need the most work. Window reveals turn back towards the frame. A porch creates short returns and tight corners. A projecting stone band interrupts the surface. Each is an edge where the render has to stop on a bead or turn a corner, even if its area is small.
An insulated system adds a further dimension because it moves the finished surface outwards by the thickness of the boards plus the render. A stone sill that projects comfortably beyond the old wall may then sit nearly flush, losing its drip, and pipes and fittings need longer brackets. Look at the details in section, not only in a front view.
Number the returns and features on a photograph so each one can be named in the quote as included or excluded. No drawing software is needed; the labels just have to mean the same places to everyone.
| Mark | Meaning |
|---|---|
| Known masonry | Visible material identified for assessment. |
| Existing coating | Background or coating history may need checking. |
| Later alteration | Possible change in construction or behaviour. |
| Retained feature | Surface excluded from coating and needing protection. |
| Designed joint | Interface requiring a coordinated detail. |
Mapping the wall yourself
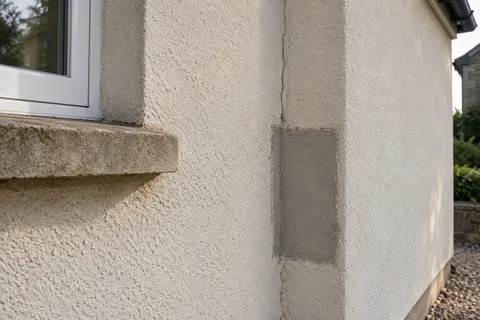
You can learn a lot from the ground. Look for brick courses showing through old paint, straight vertical joints where an opening was filled or an extension added, and patches of render that are a different colour or texture. Tap the render you can reach: a hollow sound means it has come away. Note where render meets bare stone and whether it laps onto the stone face.
Photograph each elevation straight on and from an angle, and close up at each change. Old plans and invoices help, especially where an opening was altered, but keep their dates: a drawing of an intended construction is not proof of what was built.
If high areas cannot be seen from the ground, note that they need checking from scaffold rather than assuming they match the wall below.
Junctions between materials
Where two backgrounds meet, the render above them is under stress, because the materials move and take up water differently. That is where cracks start. Three approaches are used, depending on the junction. Where the junction is stable and both sides are similar, mesh bedded across it in the base coat spreads the stress; K Rend describes its mesh as reducing the build-up of stress at typical stress points. Where the two parts will move independently, such as an extension against the house, the render stops on beads either side and the joint is left as a line. Where render meets stone that is staying bare, it stops on a stop bead at the stone edge.
If the survey finds something different from what was expected, such as a cosmetic patch that turns out to cover an altered opening, update the record and the treatment for that area before work continues.
Concrete lintels and sills set into stone or brick walls are a junction too. They take up water differently from the walling around them, and a crack along the top or ends of a lintel in the render often marks that line.
Keeping exposed stone clean and the edges crisp
Where part of the stone or brick stays exposed, the line where the render stops is often the most visible thing on the finished wall, so draw it on the photograph and agree it before work starts. The render should stop on a straight stop bead at the edge of the stone, never lapping onto the face, and the stone should be masked while render or coatings go on.
Clean splashes off the same day, while they are soft. Bradford Council’s stone guide discourages stone cleaning in most situations because, done incorrectly, it can damage the stone, so it is far better not to need it. Review the finished line from the usual approach to the house as well as close up.
The finished elevation may be meant to look consistent even where the preparation underneath differs. That is fine, as long as the quote describes the different preparation and the sample shows the visible finish.
Example: a painted panel above a door
For example, on a hypothetical stone house, a painted panel above the back door looks different from the stone around it. A panel like that often marks an altered opening: a doorway made narrower, a window filled in or a lintel replaced, with brick or block patched into the stone. Tapping it, looking for straight joints at its edges and checking for a lintel above the door all give strong clues. If it is brick infill, it needs its own preparation and, where the rest of the wall stays bare stone, a decision about whether to render the panel, face it in matching stone or leave it painted.
After the work
Keep the marked-up photographs of the wall as it was when stripped. They show where the infill panels, old openings and patched areas are, which is exactly what the next person needs when a crack appears or a fitting is moved.
If the survey shows the wall needs several kinds of work, the Bradford home page links to the repair, wall rendering and insulation pages for each.
See housing and planning information for Bradford and nearby places, including the source and geography behind each figure.