Cracks, loose render and patch repairs
Render repair in Bradford
Render repair means replacing the parts of the render that have cracked, come loose or fallen away, and keeping the rest. Bradford Council’s render guide is clear that loose or cracked render should not be ignored: it may be letting water into the stone behind, and frost forming behind it can force it off the wall.

On this page
Finding the loose render
The council’s guide gives the test: tap the render, and if there is a hollow sound it may be loose; those areas can be patched. A methodical tap test covers the whole wall, not only the visible crack, and the hollow areas are chalked on the surface. On a rendered upper storey that might reveal a hollow band under the eaves, loose render around a window or a blown strip along the base.
Cracks need reading too. Fine crazing is usually surface shrinkage. A long crack around a bay or along a window head may mark where the render has parted from the wall behind it. Cracks that keep widening, or run on through the masonry, need a surveyor to look at them before any patching.
Bays, porches and the bottom metre of the wall are the usual trouble spots, because that is where splash-back, leaking roof flashings and failed sills put the most water into the render. Check those areas closely even if the rest of the wall looks sound.
- Map the damage Tapping finds hollow areas; cracks and their likely cause are noted.
- Cut back Failed render is cut out to a sound edge, usually squared off.
- Fix the cause Leaking gutters, sills without drips or render below the DPC are dealt with.
- Rebuild in coats Using a material compatible with the surrounding render and masonry.
- Blend the finish Texture is matched; colour may need a coating over the wider area.
The usual order of work. The survey and the chosen products decide the actual steps.
Why render fails on Bradford walls
The guide points to the main mechanisms. Hard cement render on a stone wall is impermeable and harder than the stone, so water that gets in is trapped behind it; it is also inflexible and cracks with changes in temperature, letting in more water. Water collects where gutters and downpipes leak or overflow, which the stone guide lists among the first things to check. Freezing water behind the render then pushes it off. A repair that ignores the water source will fail in the same place.
Making the patch
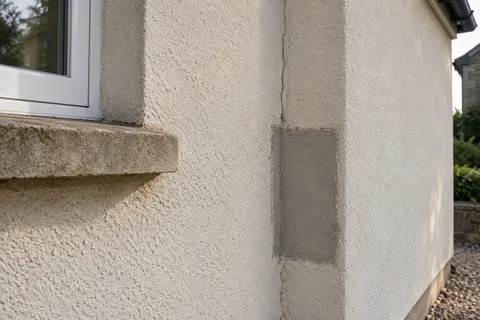
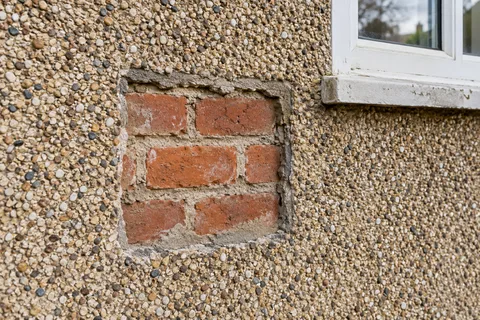
The hollow area is cut out to sound render with neat, square edges so the patch has a firm shoulder to finish against. Loose material is cleared back to the stone or brick, the joints behind raked and repointed if needed, and the background dampened or given a bonding coat. The patch is built coat for coat to match the surrounding render and finished to its texture. On lime render the patch is lime, in line with the council’s recommendation of soft lime-based render in three coats. On a modern cement render, the repair material should be similar in strength to the original so its edges do not crack.
Tap the wall; mark loose and cracked render in chalk.
Cut out to sound render with square edges.
Clear loose material; repoint the joints behind if needed.
Dampen the background or apply a bonding coat.
Rebuild the patch coat by coat to the surrounding level.
Match the texture and recoat once the patch has cured.
Matching the finish
Limewashed render is the easiest to blend, because the whole elevation can be limewashed again once the patch has hardened; the council’s guide says to use the same coating when repainting. Pebbledash and roughcast are harder: the stone in the patch has to match the size and colour of the original, and it will still look cleaner for a while. A through-coloured wall takes a patch in the original product, though the new area stays brighter until it weathers.
Stopping it happening again
Clear gutters and repair leaking downpipes, and keep drains and gullies at the foot of the wall clear, as the council’s stone guide advises. Check the render after hard winters, especially along the base and below sills. Small repairs done promptly stop frost turning a crack into a hollow patch.
Common questions
Should the whole wall be re-rendered instead?
If hollow patches link up over most of the wall, or the render is hard cement on a stone wall that is suffering behind it, renewal is usually better. Scattered patches on otherwise sound render are a repair job.
Is a damp patch inside caused by the render?
It can be, if the render is cracked or hollow, or carried down past the damp-proof course. Check the render, gutters and sills on that wall first. Damp with other causes is a matter for a different specialist.
See housing and planning information for Bradford and nearby places, including the source and geography behind each figure.